Intro to Git and how to use it

There are a lot of articles about git out there but as I'm starting to explain git quite often now, I've decided to write my own article about it.
The goal of this post is to share and explain some git scenarios that a beginner or intermediate user will encounter.
Summary
- Introduction to Git
- Common use cases for git
- List of the most common git commands
- Common Git scenarios
- External resources
Introduction to Git
Git-scm
Git is a version control system, meaning it allows you to save different snapshots of your documents as they evolve. It creates many versions of the same documents over time and allows you to go back to an older version if necessary.
Version Control Systems (VCS) or Source Control Management (SCM) are quite common among the software development ecosystem as it allow developers to save, share and collaborate around projects.
There are a lot of different SCM out there, such as Subversion or Mercurial, but Git is by far the most popular one. It's smaller, faster and distributed, meaning it can work offline and be synchronized between multiple computers.
Centralized System vs Distributed System:
Centralized System
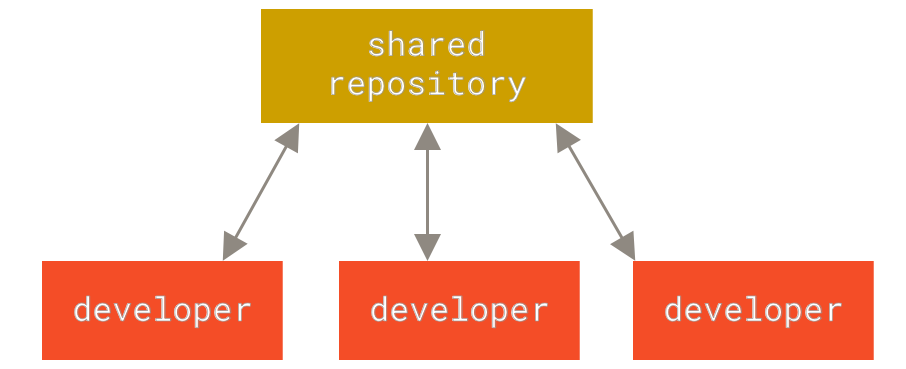
Example of Centralized system. Computer A and B are sharing the same source and might override each other.
Distributed System
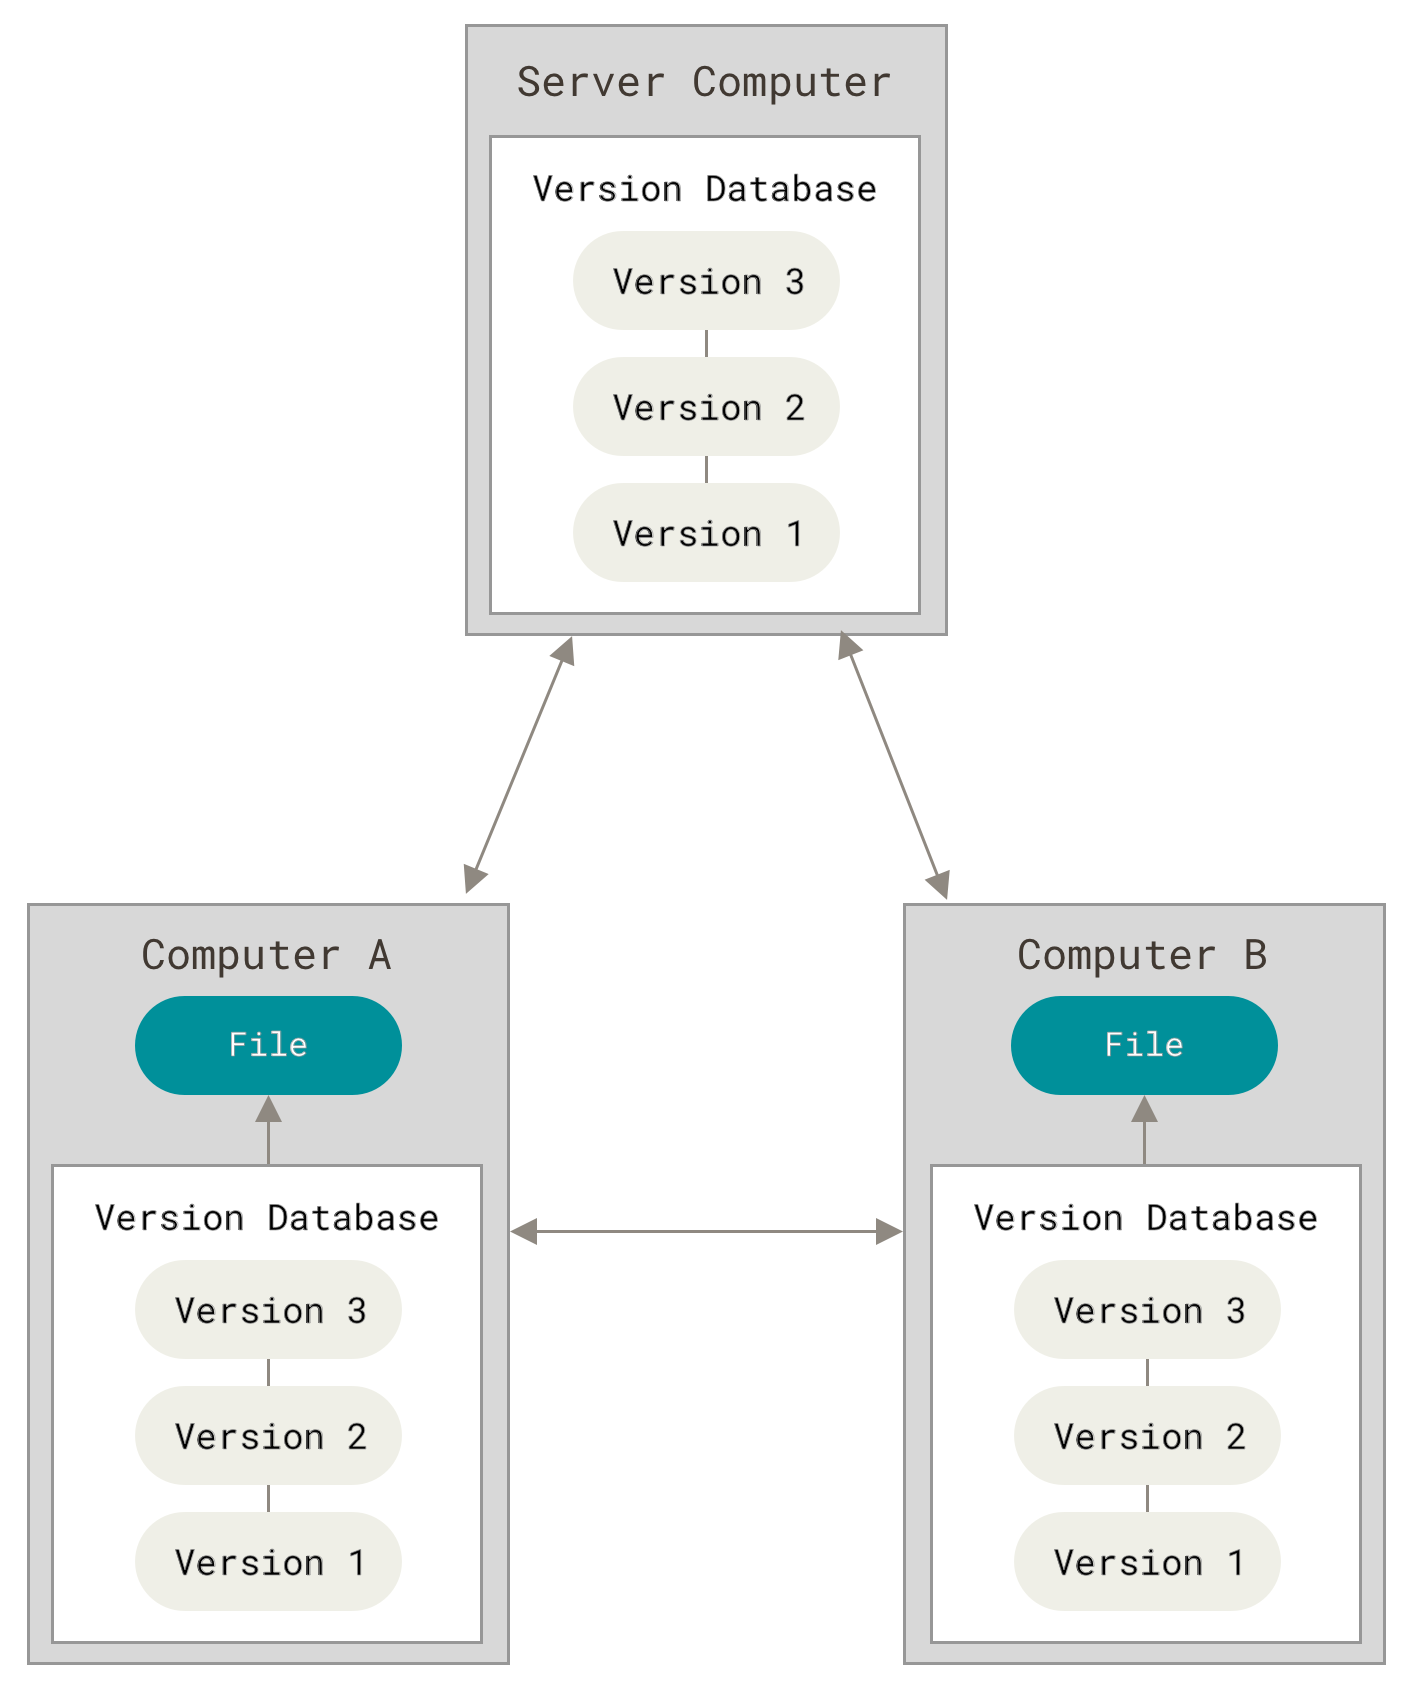
Example of Distributed System. Computer A and B have a copy of the repository. They can work offline and the system will be able to synchronize each repository if needed.
Both images come from Git Book v2 - About Version Control
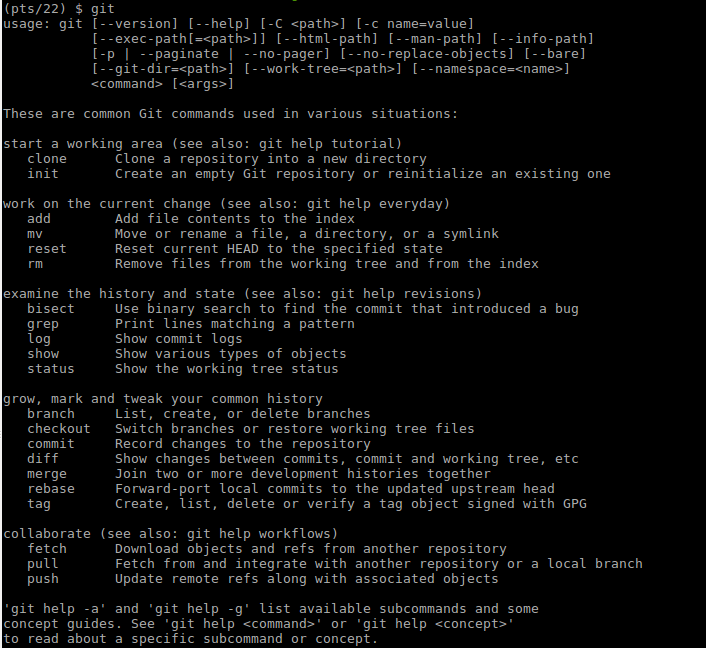
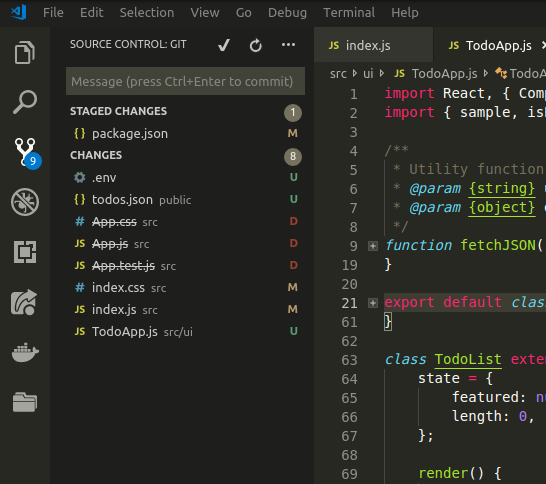
Git by itself is a light-weight program that runs on all popular operating systems. It runs on your terminal, but there are many visual interfaces or editor integration for those less experienced with command line tools.
Code hosting services
There are a lot of source code hosting services out there. The most popular ones are:
- GitHub: host your open source projects online using Git SCM
- Gitlab: host your private or public projects using Git SCM
- Bitbucket: code hosting service teams, using Git SCM
All of these (and more) have the same goal: host your source code on a secure server using Git. Each service has different features but all have the same promise in common.
The most popular one is Github. Many developers use it to host public projects that may serve as portfolio.
Common use cases for Git
Git being decentralized, it can be used in many many ways.
The most common use case is probably, as a single developer to save your code as you write it and save it in a remote server (Github for example).
Git allows you to work more confidently, you can save your code whenever you decide to. If a piece of code is bugging or you are not satisfied about it, you can discard it and go back to an older, stable version.
An other use case is to synchronize and share your code with multiple developers. Git lets you save your version of your code and provide different tools to merge your source code with another developer.
Without Git or an SCM tool, you will need to do everything manually:
- write your code
- zip it and send it to the other developers
- the developer will unzip it and have to merge the differences manually (or using tools like meld)
- zip the merged version and send it to the other developers. When all developers have the same version, go back to step 1.
With Git, the workflow changes:
- write your code
- save the code at a specific version (date, author and id)
- push the changes to a remote server (private or public)
- the other developers pull the changes to their computer
- git tries to merge the difference or tell you what files have to merged.
- all the developers have the same code version. Back to step 1.
Those are two common use cases but there are more advanced or complex ways to use git. For example, branching is used to create different versions of your application that can be compared, merged, or the best version can be selected. Git hooks allow you to run custom scripts during the git life-cycle, for example format the code or run tests before saving some changes.
In this article, we will focus on more common use cases of git. The goal is to provide some common scenarios for beginners.
List of the most common Git commands
Git itself is a program with many commands. Each command has a very specific task. We will go through the most common one here and then see them in action in different use cases.
I'll focus on the command line version, but most graphical tools share the same vocabulary or command names.
The git usage is as follows. In a terminal you type git, then the command, then the options and the parameters: git <command> <--options> <paramters>
Following are different examples:
git help: the most important one, it will print the git usage.
git help <command> gives you the usage for a specific command (i.e: git help commit)
git init, git clone <url>, git add <file1> <file2>, git commit --message "Commit message"
Most common Git Command
git help
Whenever you are stuck or need specification on your git usage, run this command. If you need to know more about a command, run git help <command> to know more about it.
git init
This command lets you initialize a new git repository. In order to set up git for your project, navigate to the root folder of the project and run this command.
You won't need to run it again in the same project. To check that it worked, you can run git status. If there is no error, your git repository has been initialized correctly.

git clone
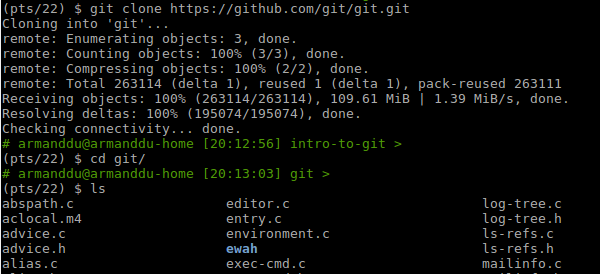
git clone is the second way to initialize a git repository. Instead of initializing a new empty repository, git clone will let you "clone" an existing repository.
You will need to provide the location of the existing repository to make it work:
Usage: git clone <url>
Example: git clone https://github.com/git/git.git
This will clone the repository for the git source code. (hosted in github)
git add
This command allow you to add a new/edited/deleted file into a "staging area".
When you are developing, you will create/edit/delete some files. When you want to save those files (using git commit bellow) git will ask you what specific files and with what specific content you want it to save.
This gives a lot of control on what is saved and when.
Usage: git add <filename1> <filename2> <filenamex...>
Example:
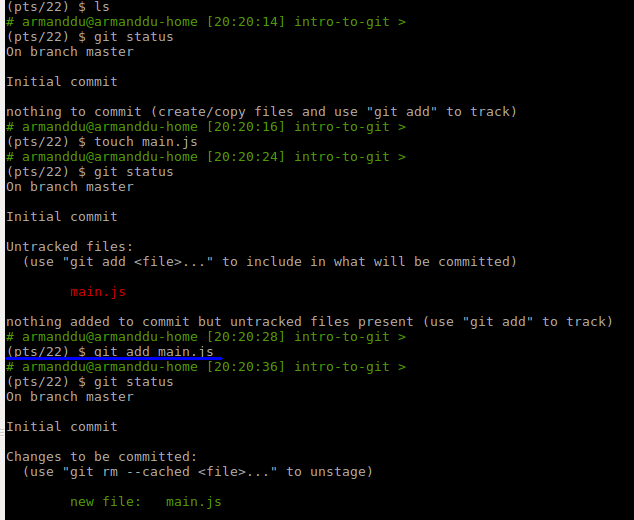
In this example, we create a new file named main.js. "git status" (see below) first tells you that the file is untracked and won't be saved on the next commit.
We run our command "git add main.js" and then the "git status" tells us that the file is now tracked and will be saved when running "git commit".
Git status also tells you how to unstage (untrack) the file, by running git rm --cached main.js
git diff
This command is useful to compare the difference between two versions of your code.
It's encouraged to use it before committing to make sure that no bugs or unwanted code are left in your repository.
Usage: git diff [<refA> <refB>] [--cached]
Examples:
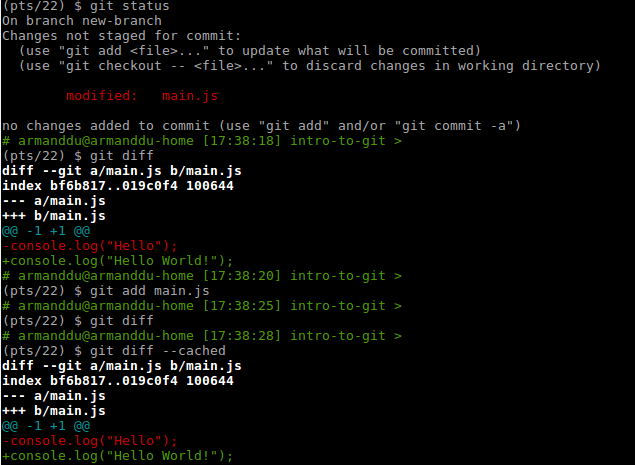
git diff is used to show the modified code.
If you wish to see the differences of the files in your staging area (after using git add), you need to use the --cached option, as in the next example.
git status
This command lets you see the status of your current directory. It will give you info on:
- what files are tracked or untracked
- what files have been created/edited/deleted
Because git lets you precisely decide what should be in the next commit, you must always check the status of the current working directory.
Always be careful when adding files. You may have added a file with some sensitive data - use status to check if that file has been added by mistake or not. You might have edited a file after adding it - in that case the latest change won't be committed. Use status to check the latest state.
Usage: git status [--short|-s]
Examples: git status | git status -s
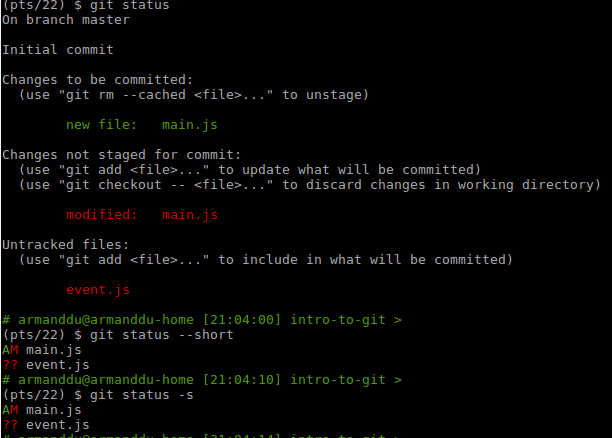
We can see that the new file main.js has been added to the tracking system but its latest modifications are not tracked.
event.js is not tracked at all by git. We can decide on many actions according to our needs.
For example, git checkout -- main.js to remove the latest changes in main.js or git add main.js to track the changes instead.
git commit
"git commit" allows you to save the tracked changes into the git repository.
This will be performed on your computer and create a new version of your tracked code. A commit is authored, dated, and given a message an ID.
Usage: git commit [--message|-m]
Examples:
git commit (will open an editor to let you write down a commit message)
git commit --message "git commit message inline, without opening an editor"
git commit -m "-m is a shorthand for --message"

The commit message is really important. Providing an explicit commit message will help you (and other developers) understand what was introduced in this commit and help identify/debug if needed.
git log
"git log" allows you to see the commit history of your git repository. You can decide what to log and in what format. Logging lets you learn about the number of commits, their authors, the dates and more information.
Usage: git log
Example:

The yellow number (77a52c8080....) represents the ID of the commit. It's the SHA-1 hash of the commit.
git push
"git push" is a command to push the latest commits to a remote server. It only works if you have specified a remote repository by using "git clone" or "git remote add".
This command is quite complex and won't run if your repository isn't clean, or if it is not synchronized with the remote repository, or if you don't have the permissions on the remote repository.
The basic usage is: git push origin master.
origin is the default name of the remote server
master is the default name of the main "branch"
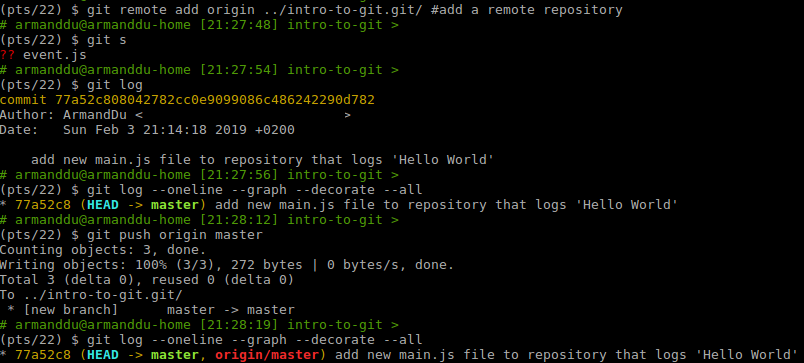
In this example, I'm using git remote add to add a remote repository.
git log --oneline --graph --decorate --all lets me see the commit history in one line and see the default branch master
"git push" will push this commit history to the remote repository (origin).
Running git log again will display the commit history, synchronized with the remote.
It is quite complex but with practice it will get easier.
git branch
git branch is a more advanced command. It allows you to split your repository in multiple version. By default, there is one branch for each repository and it's named the "master" branch.
You can decide at any time to create a new branch. Each new commit will only be applied to the new branch. If you switch to the master branch again, you won't see the commits made in the new branch. If you create a new commit in the master branch, it also won't be visible in the new branch.
This advanced feature is useful when working on different independent parts of the application. It lets you focus on one task at a time or let a developer work on an isolated branch without risking to break the master branch. git has some commands to merge two branches back into one or discard a branch if not needed.
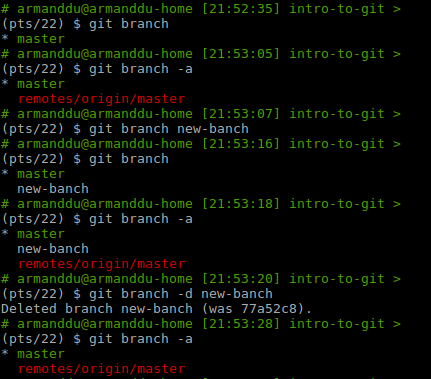
The git branch command let you list, edit, add or delete a branch.
Usage:
git branchto list the local branches.git branch -ato list local and remote branches.git branch <branchName>to create a branch.git branch -d <branchName>to delete a branch.
Examples:
git checkout
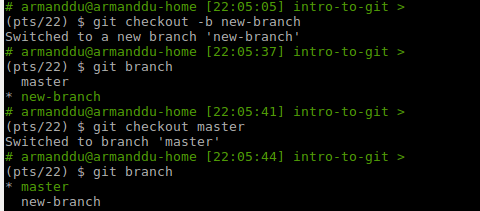
"git checkout" lets you change branch or restore the files in your working directory.
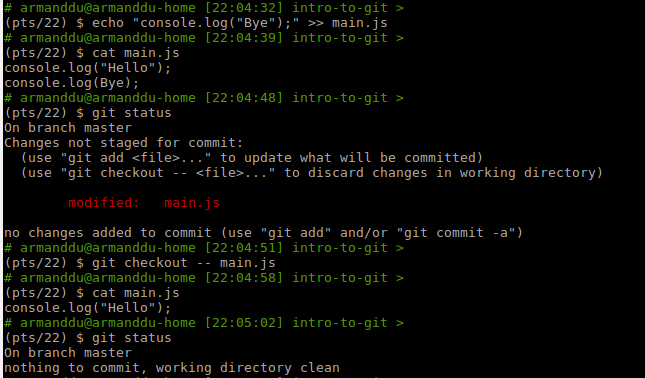
As seen in the git status screenshots, git remote can be used to reset a file to its previous state. It's an easy way to remove all unwanted changes in one or more files.
It also is useful to change branches.
Usage:
git checkout -- <filename>to discard the latest changesgit checkout <branchName>to switch to<branchName>git checkout -b <branchName>to create and swicth to<branchName>
Examples:
git fetch
"git fetch" allows you to synchronize your local repository with the remote one.
This command is important when working with other developers or developing on different computers.
"git fetch" is useful when you wish to receive the latest changes in the remote repository or when you want to push to the repository.
Git will refuse to push your changes if your local repository is not up to date with the remote repository.
"git fetch" will not change your working directory, it will only synchronize the local repository with the remote one. If you wish to actually have the latest changes to your working directory, you'll need to use the git merge command.
Usage: git fetch
In the following example, a new commit has been added to the remote repository using another computer. Before the fetch, the local repository has no information about this commit.
After the git fetch, a new commit is added to the git commit history.

git lg is a custom alias that I have configured on my computer.
lg = log --oneline --decorate --all --graph
git merge
"git merge" allows you to merge two different branches into one.
You can use this command to merge the latest changes from the remote repository into the local repository or to merge two different branches together.
Usage:
git merge <remoteBranch> <localBranch>git merge <branchA> <branchB>
Examples:
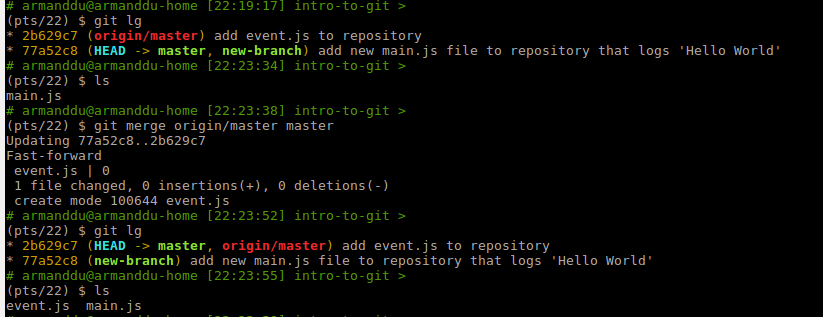
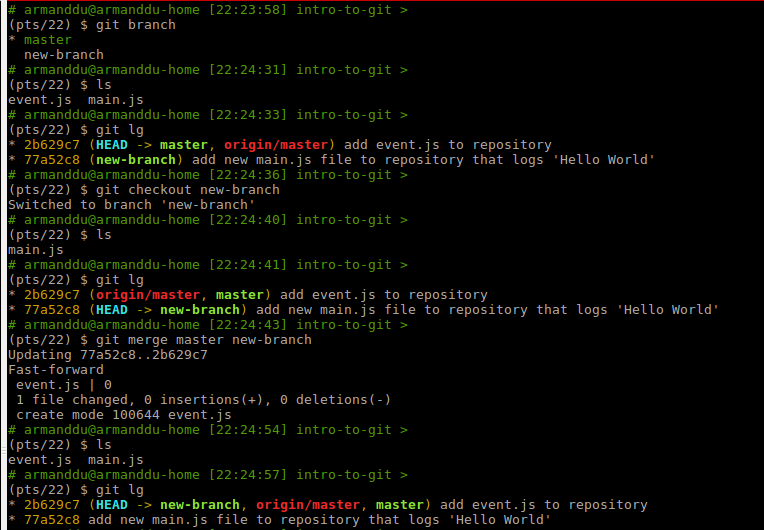
In the first example, we merge the content of the remote repository in the local one. (event.js is added to the working directory).
In the second example, we merge the content of master in new-branch.
This is how we can use git to automatically track, save, share and synchronize your code with multiple developers.
git pull
"git pull" is a shortcut of "git fetch" then "git merge".
This command is often seen on other articles and is quite handy. I personally try to avoid it because I often want to inspect what has been changed to the repository before merging.
Usage: git pull
git remote
This command allows you to list or edit the remote repositories configuration.
This command is quite rarely used, since using git clone will set a remote automatically.
In general terms, a remote is an url to a remote git repository that you can synchronize your local repository to. There is no limit of remote for one repository but most of the time, you will only have one. When using git clone, git will name the remote "origin" by default. We will usually keep this convention for the main remote.
Usage:
git remote -vlist all the remotes for this repositorygit remote add <name> <url>add a new remote for this repository
There are more commands and even options to the previous commands. But the one shown are the most common ones. Most of the time, you'll be using only a few of them, such as add, status, commit and push.
In the next section we will display some common workflows when working with git. The aim of this section is to showcase some guidelines for beginners.
Common git scenarios
Scenario #1: Using git for simple version control
Context:
You are starting a new school/side/personal/professional project and you want to use git to track change over time.
Commands involved:
- init
- add
- status
- commit
# create working directory
mkdir my-side-project
cd my-side-project

git init
> Initialized empty Git repository in ~/my-side-project/.git/

# start coding
echo 'console.log("Hello World!")' > main.js
cat main.js
> console.log("Hello World!")

git status
>On branch master
>
>Initial commit
>
>Untracked files:
>  (use "git add <file>..." to include in what will be committed)
>
>	main.js
>
>nothing added to commit but untracked files present (use "git add" to track)

git add main.js

git commit -m "initial commit; create main.js file"
> [master (root-commit) 64ee6f1] initial commit; create main.js file
> 1 file changed, 1 insertion(+)
> create mode 100644 main.js

# continue coding and then repeat
echo 'console.log("Bye")' >> main.js
git add main.js
git commit -m "add log 'Bye' to main.js"
Scenario #2: publish your project to Github
Context:
You have worked on a project locally and you want to save it to Github. That way you can continue to work on that project from another computer or showcase your project to the outside world.
Commands Involved:
- remote
- push
First, you'll need to create a new repository in Github. You can go to Github.com and create a new repository.
Once the repository created, locate the "clone or download button" an click on it.
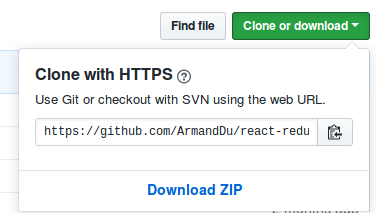
copy the link and go back to your terminal:
cd my-side-project

# add a remote to your repository
git remote add origin https://github.com/<YourUserName>/<YourProject>

# push your changes to github
git push origin master
Scenario #3: start a new Github repository
Context:
This time, we start with creating a repository on Github and then start coding.
Commands involved:
- git clone
First, create a repository on Github and locate the remote's URL by clicking on the "Clone or download" button. Copy the url and go to your terminal.
git clone https://github.com/<YourUserName>/<YourProject>
cd <YourProject>

# start coding, staging, committing and pushing
External Resources
There are a lot of resources on the web about git. Below is a selection of useful websites or articles:
- Gihub Git CheatSheet: https://services.github.com/on-demand/downloads/github-git-cheat-sheet.pdf
- Git cheats: https://gitcheats.com/
- Git-SCM doc: https://git-scm.com/doc
- Git-SCM book: https://git-scm.com/book/en/v2
- Git Diagram CheatSheet: http://ndpsoftware.com/git-cheatsheet.html
- How to use Github: https://github.com/gnsalok/How-to-Use-GitHub
